How to Make Your Own Dried Fruit
Why not lay aside what’s left of summer’s bounty as dried fruit? It is simple, economical, and requires little in the way of special equipment. Because there is no long cooking involved, drying fruits preserves more nutrients than canning.
Plus, children often enjoy this high-fiber snack to candy. You can dry fruit whole, sliced, chopped, or as fruit “leather.” Here are some of the basics of making dried fruit.
Equipment
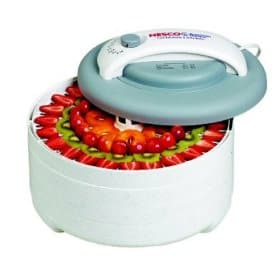
You can dry fruit using very simple implements you probably have on hand, or you can use more specialized equipment. If you live in a hot, dry climate, all you need is a screen, a cloth, and the sun. More humid climates require an oven or a home dehydrator, like the Nesco American Harvest FD-61 Snackmaster Encore Dehydrator and Jerky Maker (I’m surprised how affordable they are now):
Even in a humid climate a sunny day may do the trick – you can even dry fruit in your parked car with the windows open a crack.
Kinds of fruit
Nearly all fruit can be dried by one method or another, as long as it is just ripe, not overripe. If your fruit is already overripe, you can use it to make fruit leather.
Preparing the fruit
Technically, you don’t need to do anything to the fruit besides dry it; but steam blanching for 2-5 minutes can increase the shelf life of the fruit by destroying decay-producing enzymes.
Also, dipping the fruit in various types of solutions can enhance color retention. A universal dip that works for all fruits is made by mixing 2 tablespoons of powdered ascorbic or citric acid (or five 1-gram vitamin C tablets, crushed) with 1 quart of water. Dip fruit for 5 minutes.
Methods
-Fruit leather
Berries, apples, peaches, and bananas are good choices for fruit leathers. Puree seeded, pitted, peeled raw fruit in a food mill or blender and pour it no more than 1/4″ deep onto a parchment-paper lined cookie sheet with sides. Dry the puree in a 135 degree oven for 8-10 hours. Then, turn the leather out onto another lined cookie sheet, peel off the original parchment paper, and continue the process for another 8-10 hours. You can use a spoon handle to keep the oven door open so it will not get too hot.
-Sun drying
Nearly all fruits lend themselves to this method. You will need some sort of screened frame, which you can make yourself by stretching screen or cheesecloth over old picture frames. If you use window screens or other metal screening, lay a cloth over the screen before placing the fruit on it. Cover the fruit-covered screen with cheesecloth or another screen to keep away insects and birds. Bring the screens in at night. After about two days, turn the fruit and continue leaving it in the sun for another two days.
-Commercial dehydrator
Expect to pay anywhere from $35-$250 for a dehydrator, depending on the size and brand. With that variable a price range, you can probably find one that fits your needs. They do, of course, use electricity.
-Oven drying
You may want to use an oven thermometer in order to get the right oven temperature, 145 degrees, which will need to be maintained with the oven door ajar (for circulation and temperature regulation). It will take 4-12 hours for the fruit to dry completely – dry small batches at a time or it will take a long time.
Preservation/packaging
Once your fruit is dry, place it in airtight containers such as glass jars or plastic zippie bags. Light and moisture destroy dried fruit quickly, so put such containers into a paper bag in a cool, dry place.
Now enjoy your healthy, delicious treat!
Further Reading:
How to Dry Foods
The Solar Food Dryer: How to Make and Use Your Own Low-Cost, High Performance, Sun-Powered Food Dehydrator
Ani’s Raw Food Kitchen: Easy, Delectable Living Foods Recipes
If you liked this post, submit your email address below to get new posts by email:

